


Introduction
This presentation will highlight a use case within NetApp IT that consume most of the features that exist in StorageGRID.
Corporate IT at NetApp
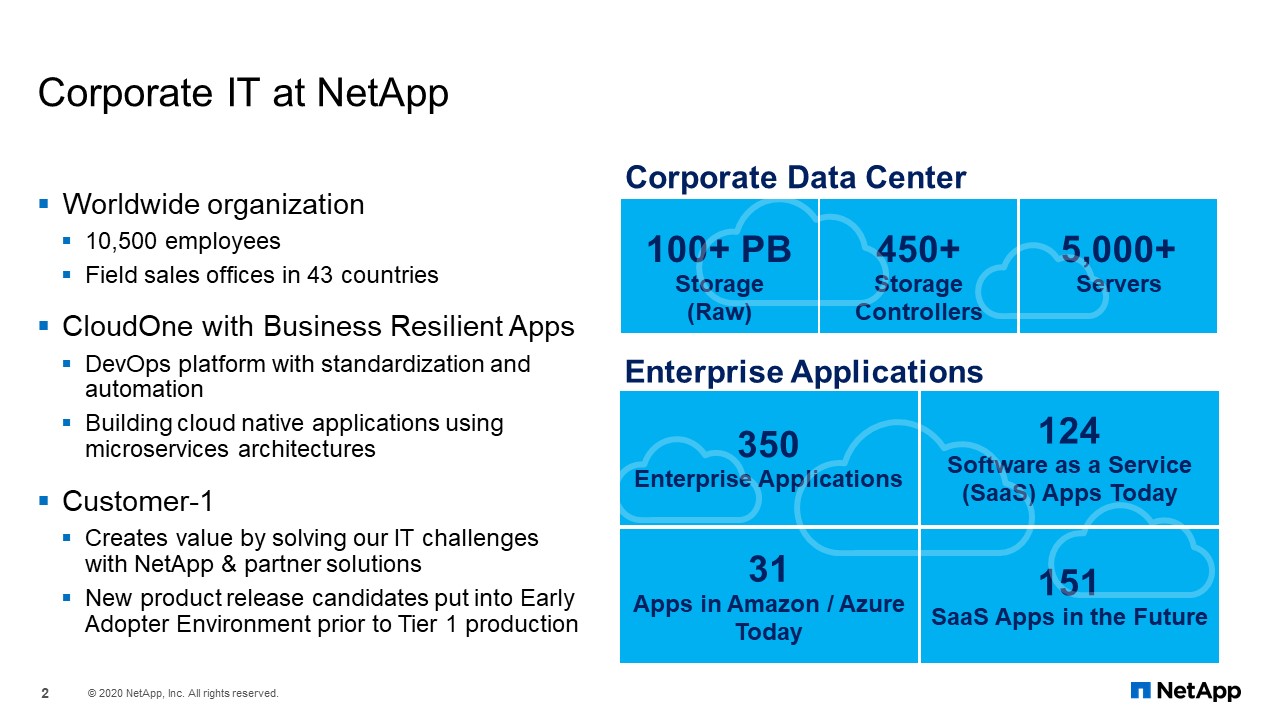
Before we get to that story, here is a quick overview of Corporate IT at NetApp.
We are currently running around a hundred plus petabytes of storage. That storage includes FAS, AFF, StorageGRID, E-Series, SolidFire, and HCI storage. Recently, we completed our 7-mode filer decommission project. Therefore, we are entirely on ONTAP. We have over 450 storage controllers and over 5,000 servers. CloudOne is our private cloud service using Kubernetes/OpenShift. Customer-1 is where IT partners with our product teams to test and roll out new features in our production environment. We also PoC (proof of concept) services like Keystone.
NetApp IT StorageGRID History
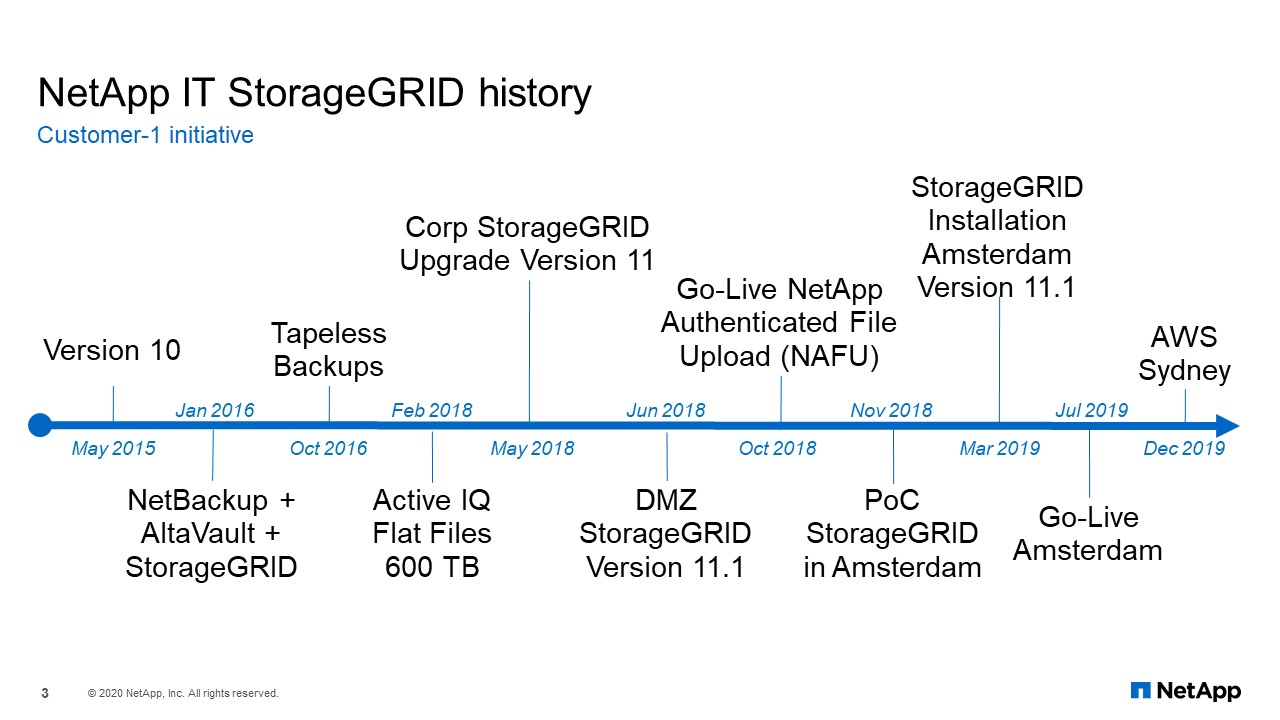
This is a little history of our NetApp IT StorageGRID journey. We started back in May of 2015 with version 10 as part of a Customer-1 initiative. Our first application for StorageGRID was for archiving to meet SOX compliance. It was NetBackup, AltaVault, and StorageGRID. Prior to StorageGRID, SOX was going to tape using NetBackup. After running tapes parallel with StorageGRID, in October 2016 we removed the tape library and went tapeless.
The next large application was Active IQ flat files. Within six months, it was up to 600 terabytes. As you can see, the type of data that we started with is archive data, and then static data. In May of 2018, when version 11 was released; it offered a big change and much needed improvements. That is when an application named, “NetApp Authenticated File Upload”, or NAFU, began using StorageGRID as the backend storage because it fit their needs (which I will go into in later slides). We created a new DMZ StorageGRID, installed NAFU inti it, and went live in October of 2018. Because of that success, we conducted a PoC and created a grid in Amsterdam in March of 2019. Then, the final project concluded with leveraging AWS S3 in Sydney.
Our StorageGRID Environment
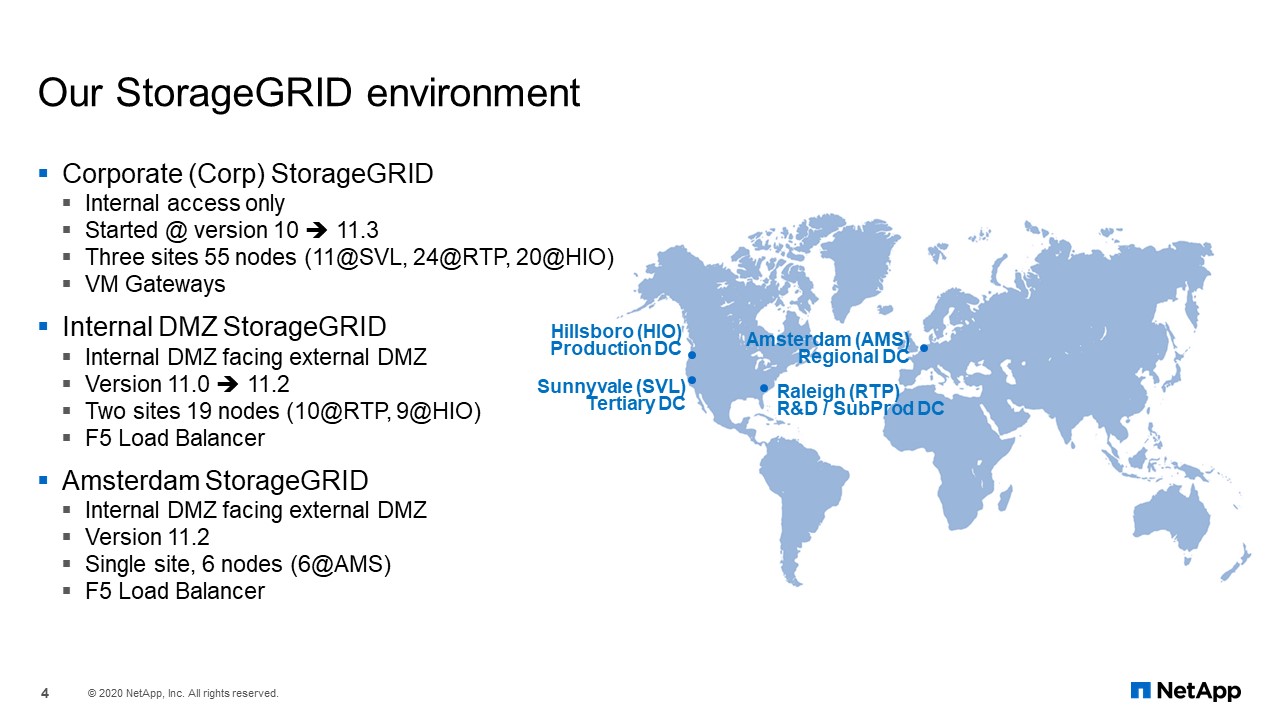
This is what our StorageGRID environment looks like. We have three production grids. The first one is our corporate grid (Corp), which is only accessible from internal NetApp network. It spans three site locations: 11 nodes in Sunnyvale, California; 24 nodes in RTP (Raleigh, North Carolina); and 20 nodes in Hillsboro, Oregon. We are using VM gateways as the endpoints for StorageGRID.
For the internal DMZ, it is a two-site grid because Sunnyvale is no longer considered a data center. This gives us 10 nodes in RTP and 9 nodes in Hillsboro. Instead of using VM gateways, we started using F5 Load Balancer for endpoint access to the grid.
Amsterdam is a smaller grid. It is a single-site grid, and it is also in a DMZ with just six physical nodes. It is using the F5 Load Balancer there, too.
NetApp Authenticated File Upload
NetApp Authenticated File Upload, NAFU. This is the application which drove our StorageGRID growth and direction.
NetApp Authenticated File Upload
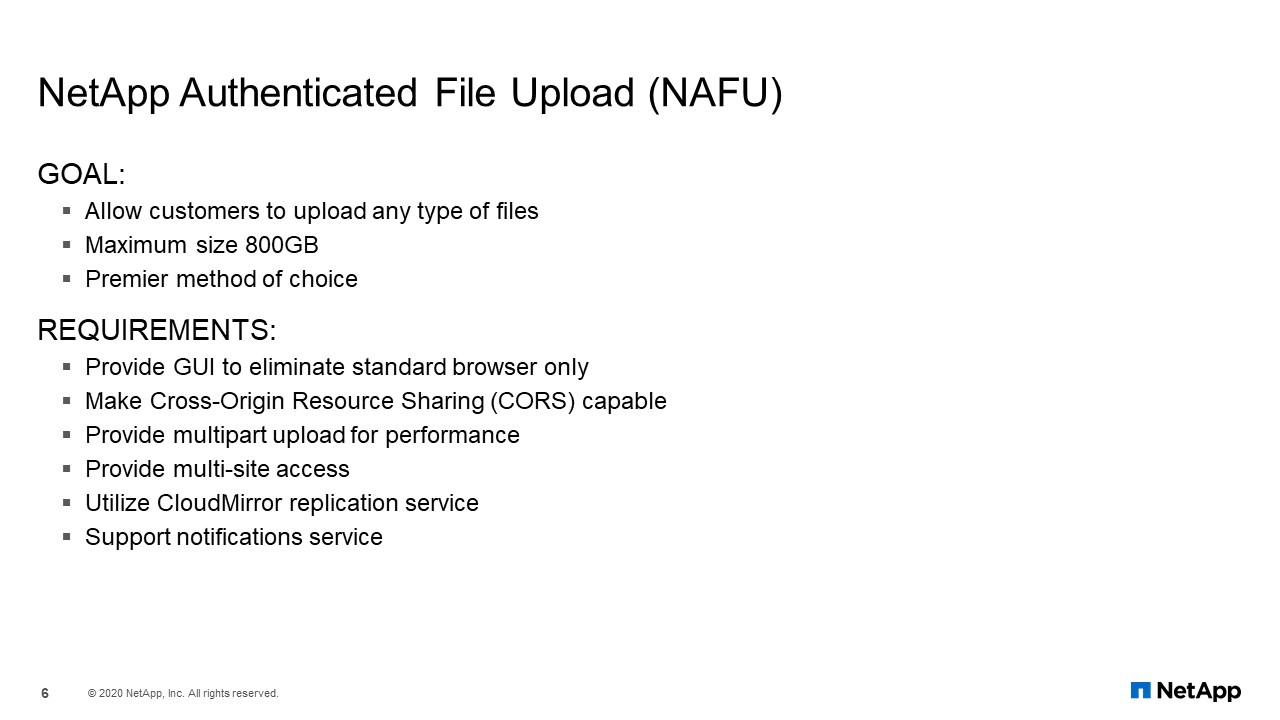
The goal of NAFU was to allow customers to upload any type of file with a maximum size of 800 GB. Eventually, becoming the premier method of choice for all file uploads. The list of requirements is shown here (which I will go through individually) was met by using StorageGRID.
The application allows the customers to upload support files without having to install any type of software or installing plugins for their browser. Within the browser, it must support CORS (Cross-Origin Resource Sharing) so that the application can move to different domains within the browser as needed. To be able to do multi-part upload, or running parallel upload sessions to maximize upload performance. It must have multisite protection so that when one site goes down, the application still works and is able to transfer data from one StorageGRID to another. Finally, it had to support notification services.
NetApp Authenticated File Upload
You might have already seen this; it is the application GUI interface. This meets the first two requirements of the browser and cross-origin, resource-sharing, CORS-capable. Customers no longer need to install any uploading software. CORS support became available in version 11 of StorageGRID. We install version 11 the day it was released. At the time, I do not think any of our customers were using CORS because it did not work. Those StorageGRID developers used our environment to figure out what was missing from CORS. They gave us an internal patch so that the project can continue.
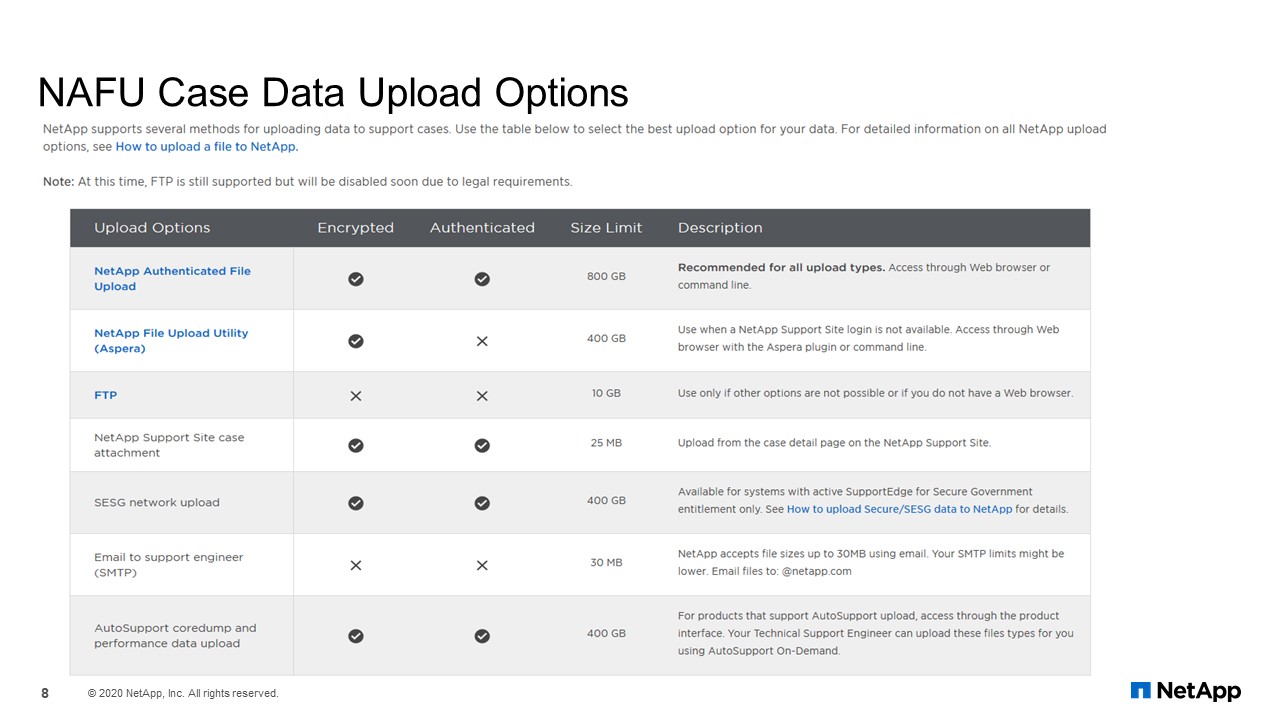
NAFU Case Data Upload Options
Although we still have our own options, some of which might no longer exist. As you can see, NAFU beats all the older methods and meets all the objectives for our project because of StorageGRID.
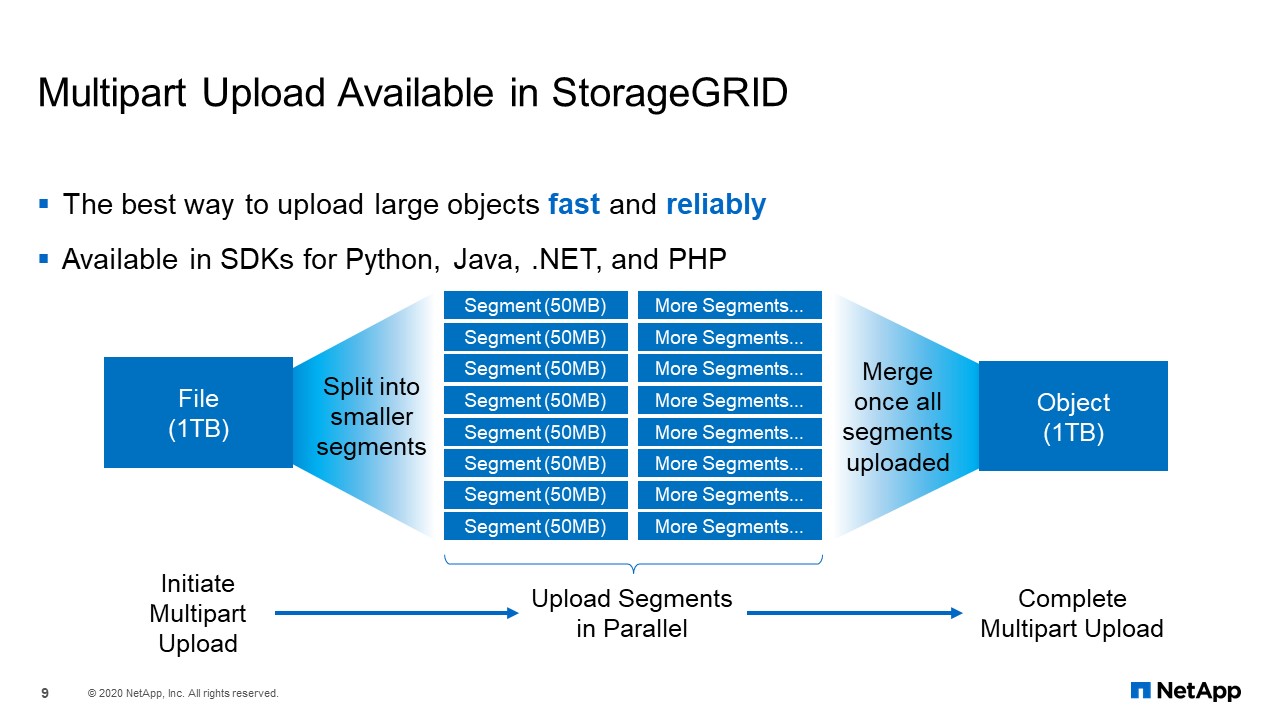
Multipart Upload Available in StorageGRID
For large file-data transfer, to get good upload performance, you either need a large network pipe, or you run parallel upload sessions. There is usually a high cost associated with large networks, and we want to avoid that. Multi-part upload is very important to our application team. With multi-part upload, everything is taken care of by breaking a single file into multiple chunks, uploading those chunks in parallel from the client, auto-start capability for chunks failure, and then putting the chunks back into a single object within StorageGRID.
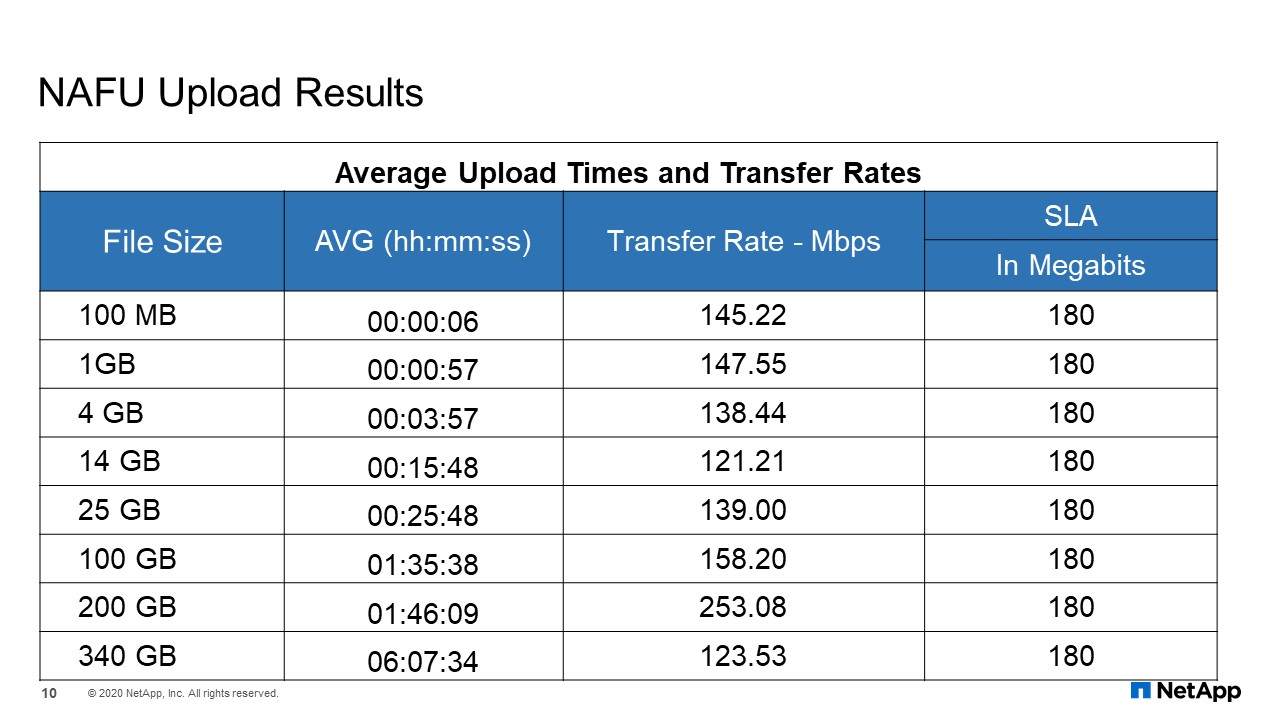
NAFU Upload Results
This is the upload testing results prior to our go live. For the smaller files, even if they did not meet the SLA of 180 megabits per second. We were more concerned about the large files and those results were good.
CloudMirror Replication Feature of StorageGRID
In the earlier slides, it shows that we started with the Corp StorageGRID. This grid is in the internal corporate network. Our security folks would not allow us to use the grid for external facing activities. Therefore, we had to create a DMZ group, but the problem was our support team was in the Corp network. The platform service CloudMirror and StorageGRID allow us to move the uploaded files that were inside our DMZ grid into our CORP grid with just using StorageGRID configurations.
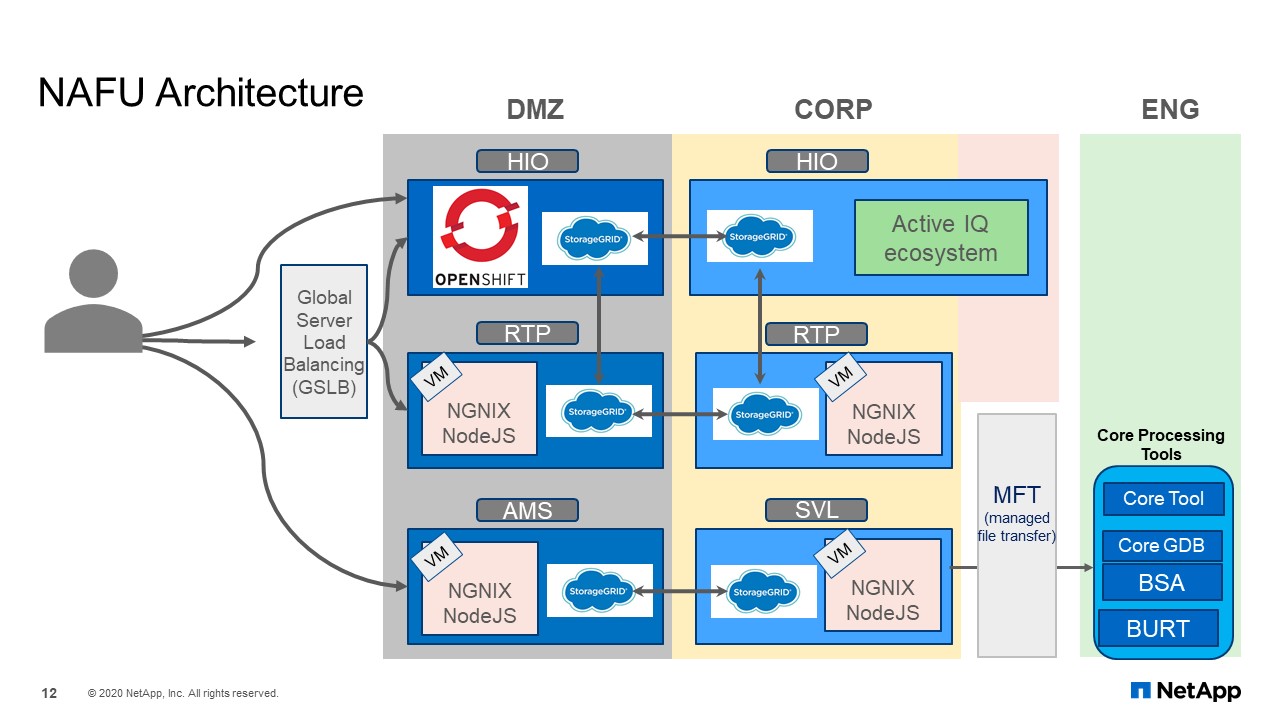
NAFU Architecture
This is what the NAFU architecture looks like. It uses an F5 Global Server Load Balancer (GLSB) as the endpoints to either Hillsboro or RTP. StorageGRID in the DMZ will transfer the data to corporate, and from there, to the engineering domain.
There are two items that this slide does not show. One is that Amsterdam grid came later. After the successful implementation in the U.S., we were still getting complaints of slow uploads from our European customers because of the distance to the United States.
We put a grid in Amsterdam to try to fix the problem. Some of you experts in StorageGRID might ask the question, “Why did we not just extend the DMZ grid to include Amsterdam as a site?” NetApp has a very small network pipe from Amsterdam to the U.S. We were not worry about how much time it would take for the file to get from Amsterdam to the United States because if our support team needed that data right away, they can always log into Amsterdam and see the data. We were worried about is the metadata. As you grow the grid to a lot more nodes, each site must have metadata about all of the other nodes. That chattiness of small packets of metadata going back and forth on a low bandwidth network could cause services within StorageGRID to queue up and cause issues for the site or the grid itself. Therefore, we chose to create a separate grid that is an independent grid. The go-live implementation of this was well-received, yet some of our European customers are very happy. I said, “Some”, but I will come back to that later.
The second item that this slide does not show is another of the requirements that the application needed: notification service. As you can guess, when a file is uploaded, how do we know the multi-part upload or, for that matter, the file reached the CORP StorageGRID? The old method would be for the program to consistently check to see if the file is available. But that is not very efficient. This is where notification comes in. We configured a bucket to send notification to Amazon Simple Notification service, SNS, so that when their file completed its uploaded, a message is sent to AWS. Then AWS SNS will push the message to any subscriber, which will be a NAFU program, and then will activate the next process. This way, the program does not need to periodically check a poll for the status of an upload file.
There you have it. Most of the features available from StorageGRID used by NAFU. Getting back to my comment about some of our customers in Europe, some were still not happy unless they were located near Amsterdam. For them, the load speed remained very slow and we are back to the original problem. Because the backend storage is object storage, NAFU is able to connect to any object storage with little or no modification. This is where AWS S3 object storage comes in.
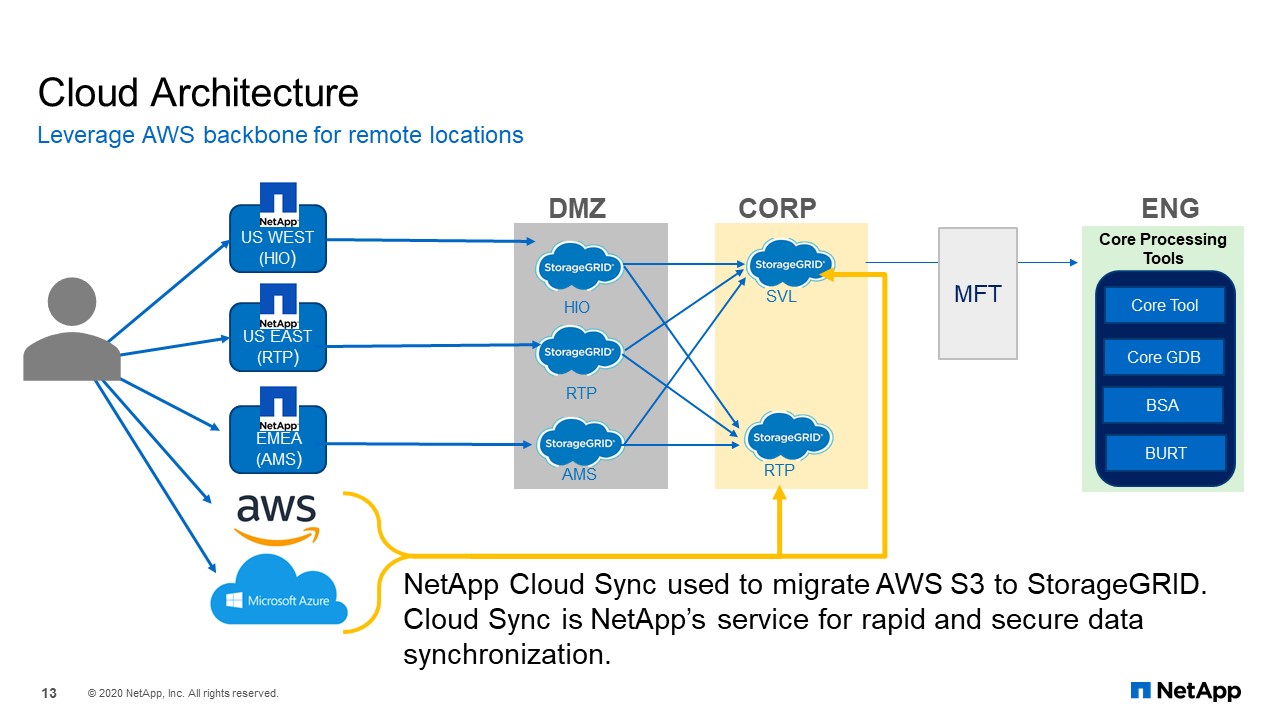
Cloud Architecture
To solve the problem, we had to spin up an AWS S3 in Sydney and pointed the application endpoints to AWS and start uploading files into an AWS S3. In the U.S., we also spin up an S3 instance as a target object storage. This way, we would use the AWS network backbone to move the uploaded file from Sydney to AWS East, and from AWS S East, we use Cloud Sync to move the files into our CORP StorageGRID. Within AWS, we do not leave the data there. Once it has been moved, we delete the files and keep costs down.
Today we can scale this AWS solution to get closer to our largest customer if needed with minimal changes to the application. Phase one of the project was to create an application using StorageGRID, which is object storage. Phase two of the project was to expand the application to Amsterdam or our European customers. Phase three, it was to find a method to be able to provide the same upload speed regardless of location, to a certain extent, because the storage backend is StorageGRID object store. NAFU should be able to connect to AWS S3 storage with little or no modifications. When ONTAP object storage becomes available, and if it becomes available for cloud ONTAP, we, as Customer-1, will look into replacing AWS S3 with Cloud ONTAP S3.
That concludes my portion of the presentation.
Introduction
Hello everyone. This is Ram Kodialbail, senior storage engineer at NetApp IT. As a member of Customer-1, we make every effort possible to use our own products and services–hopefully well before our customers do. In some rare situations, we may end up in a position where all the bells and whistles may not be readily available to meet our service requirements. Today, I will share some of our work around building some automation around StorageGRID in case you are wondering what to took us down this path.
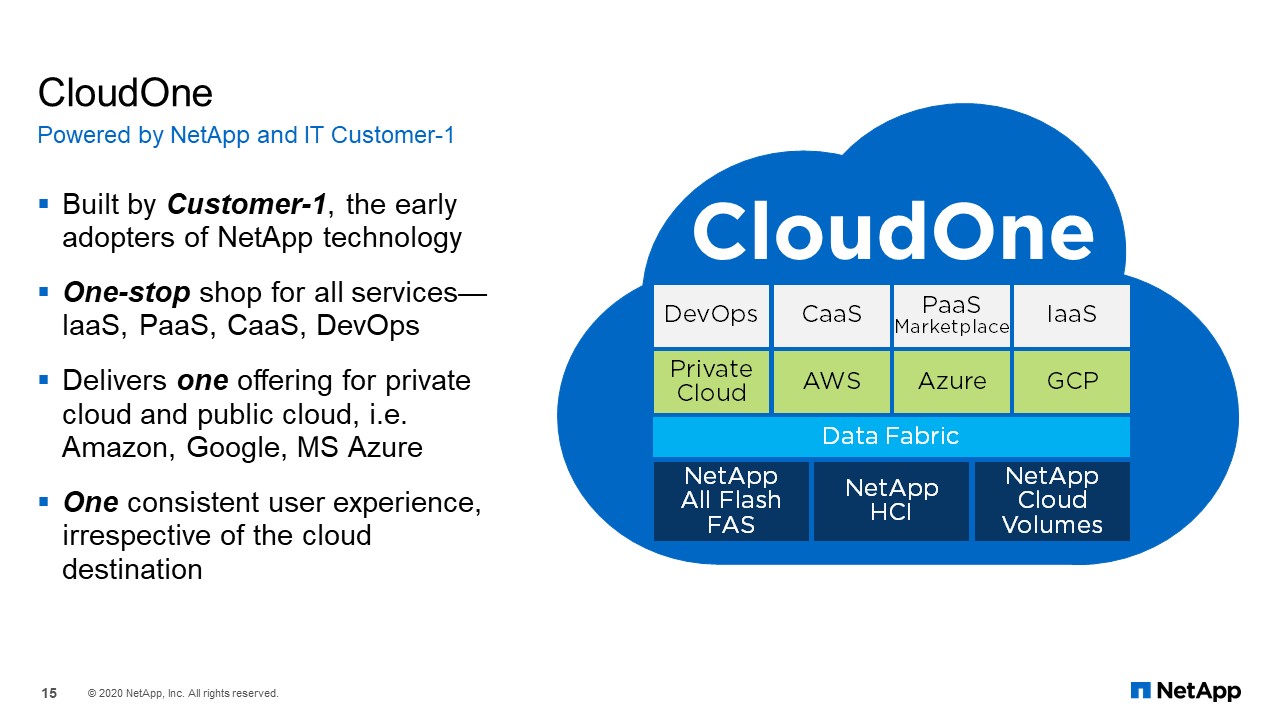
CloudOne
“S3 as a Service” was driven by the service requirements of CloudOne. CloudOne is our internal cloud and DevOps platform. CloudOne provides the cloud services, automation, and CI/CD release models that our application development teams need to build cloud-native applications. No cloud-native application is complete without object storage. As with everything else on CloudOne, our users expect self-service, hence the need for automation. If you would like to know more about CloudOne, we have several webinars, blogs and podcasts on our portal at www.NetAppIT.com.
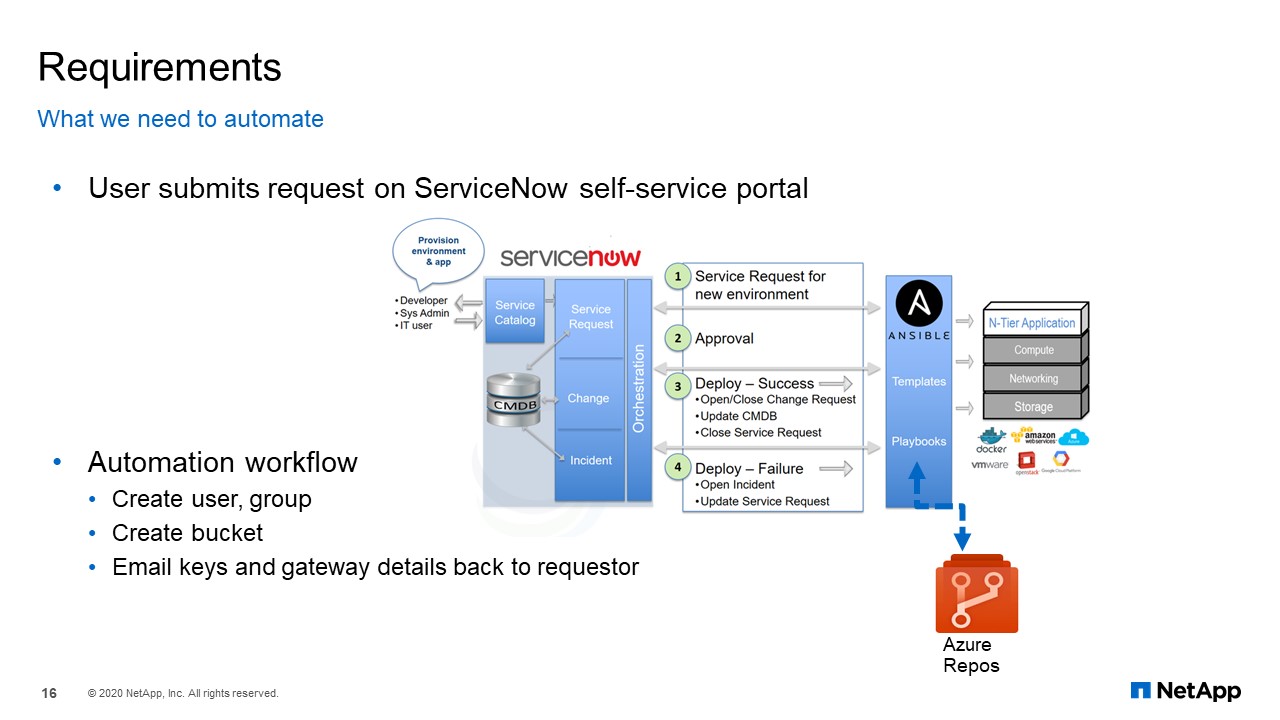
Requirements
As you can see in the image block of this slide, at the core we have ServiceNow, Ansible Tower, and Azure reports. A user submits the request on ServiceNow service portal, the modules and playbooks are on Azure reports. Ansible tower has the projects and templates for orchestration, which means that our object storage automation had to be using Ansible. The automation workflow, as you can see, is fairly simple at this point: create the user groups, create the bucket, and finally email the keys and the gateway details back to the requestor.
S3 REST API implementation
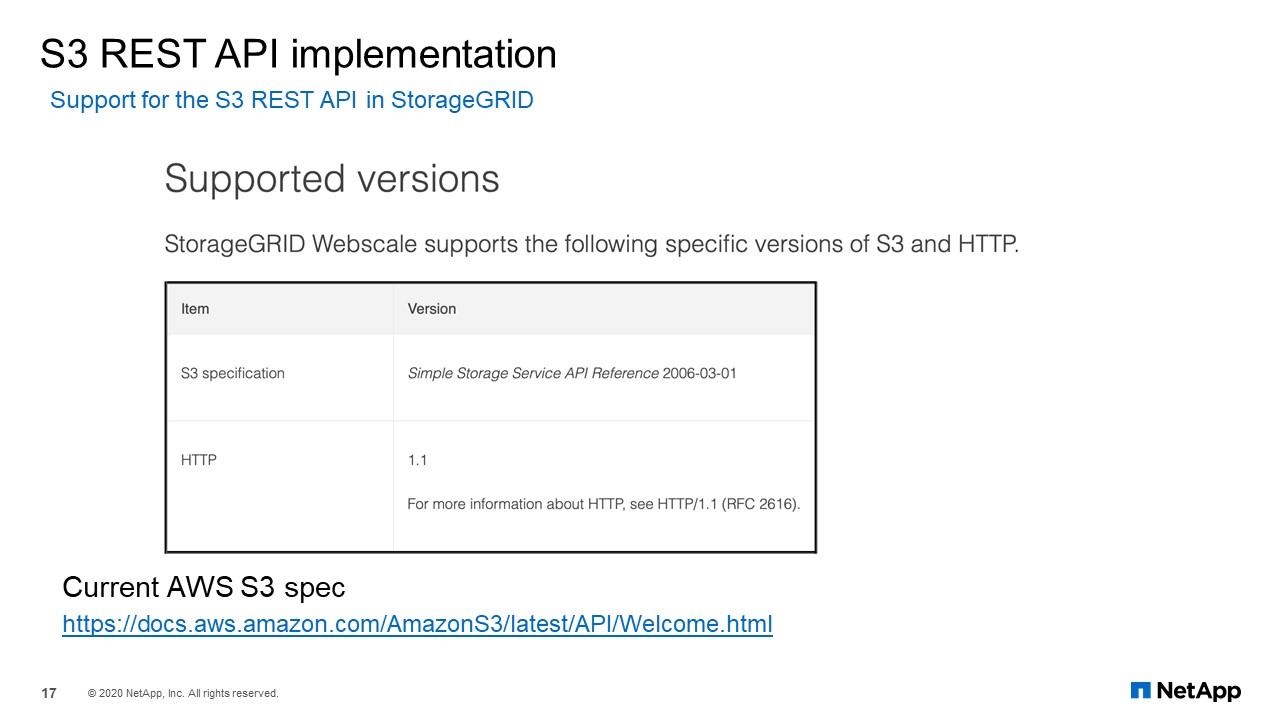
StorageGRID supports S3 and SIF protocols, which is great because it gives us REST API at our disposal. As you may already know, with REST API, you can use any programming language and treat server objects as resources that can be created or destroyed using HTTP methods.
By the way, note that REST API is supported natively on all our current generation of products and services. As you can see on this slide, StorageGRID supports AWS S3’s specifications.
Implementation Details
Given our requirements and startup blocks, we need Ansible modules. When we started working on this project, the official NetApp modules for StorageGRID did not exist. They could not use AWS S3 modules except for the S3 bucket module. We’ve considered other standard modules such as URI, but that would result in a complex playbook without a clean, desired state configuration. Writing our own custom module was the logical option.
We have Ansible 2.9. We had the S Python. We have decided to use Ansible fetch_URL as part of the standard of Ansible. Since we have REST API, StorageGRID API coding is available for us. As I mentioned before, the S3 bucket module, from the Ansible development patch, was the only module we could consume as part of the standard model build.
StorageGRID Automation Architecture
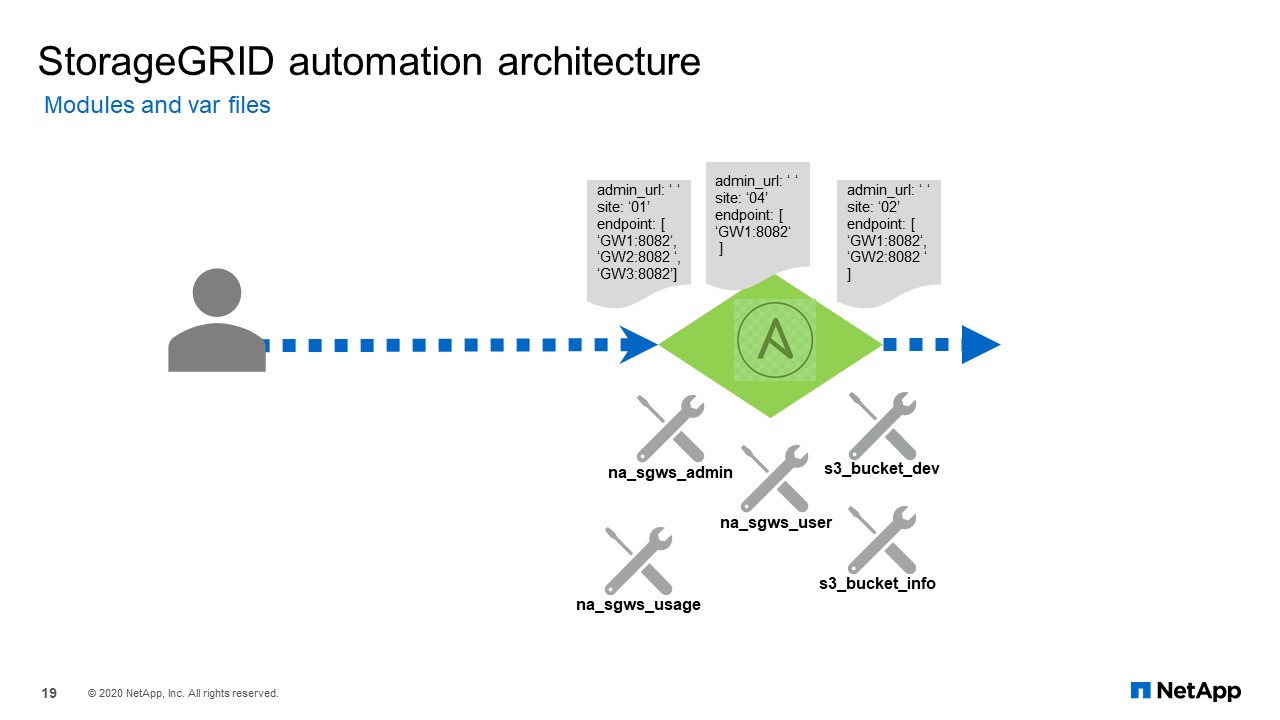
We ended up developing four modules:
- one to create and delete tenant accounts
- one to create, delete user accounts with the required group configuration
- one module to get the bucket creation timestamp
- finally, the module to report bucket usage and the standard available files, in case you want to automate across several grids.
Next few slides, we will take a peek at each of these modules that we’ve developed.
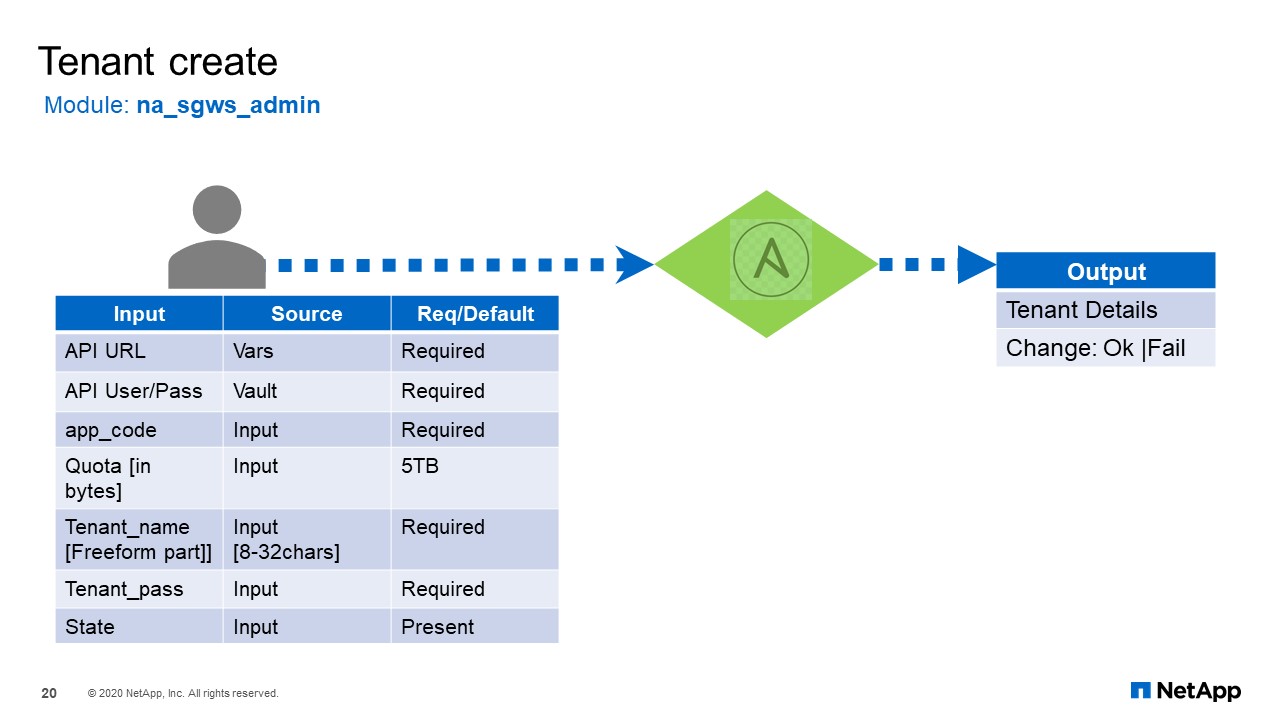
Tenant Create
The first one is the tenant create module. It has a some input that are required and some that are optional. As I mentioned, for the desired state you can set the state to “Present” or “Absent”. Once that is provided to the module, it will give you the output back and interchange sector “Okay” or “Failure”.
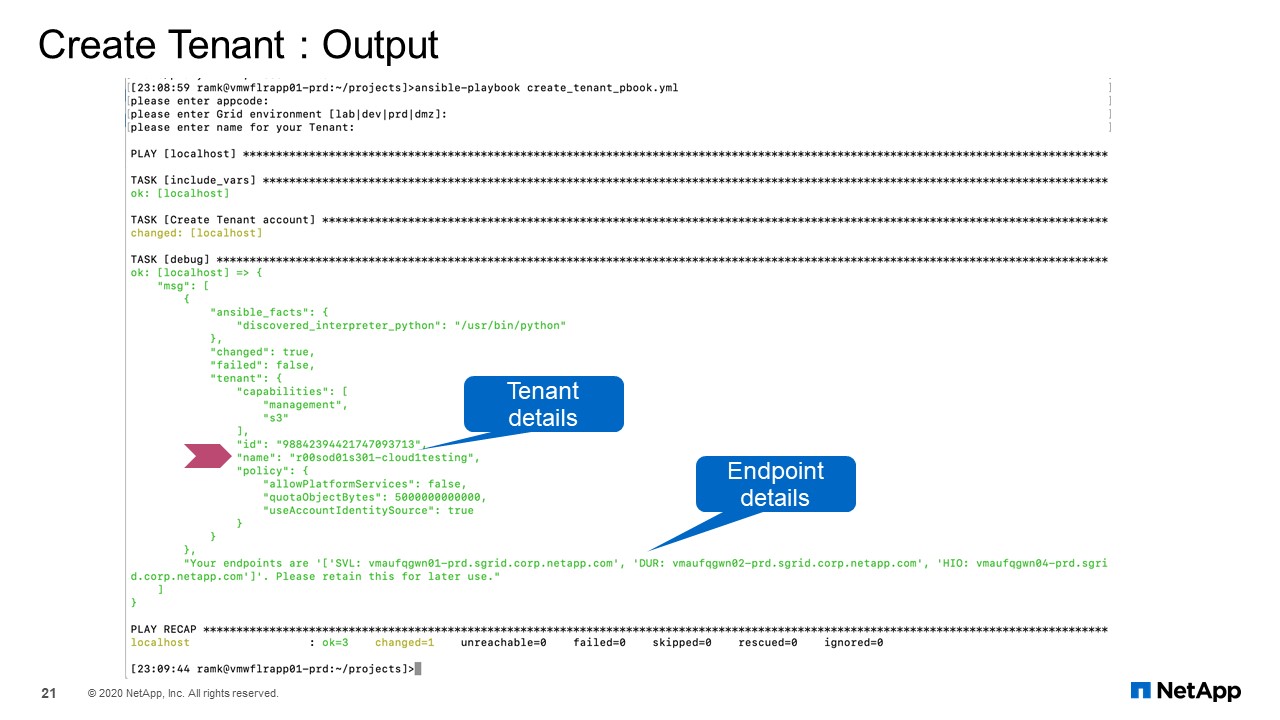
Tenant Create: Output
This is the output for you. It creates a tenant and if it is successful, it provides all the details. This is just the output of the module. It does not include complete playbook. We will cover that at the end of this presentation. Right now, we will just look at the function of each module.
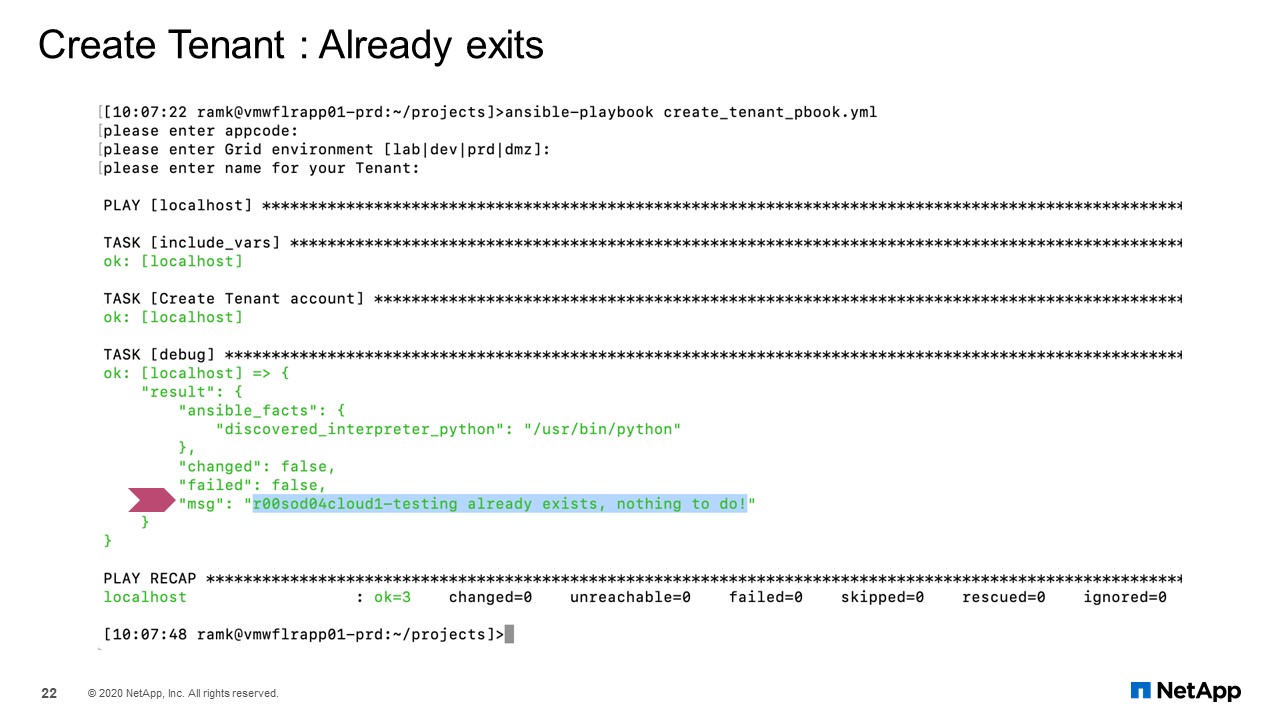
Tenant Create: Already exists
What happens if the tenant already exists? That condition must be taken care too. It gives you a message saying that a tenant exists, and nothing is to be done.
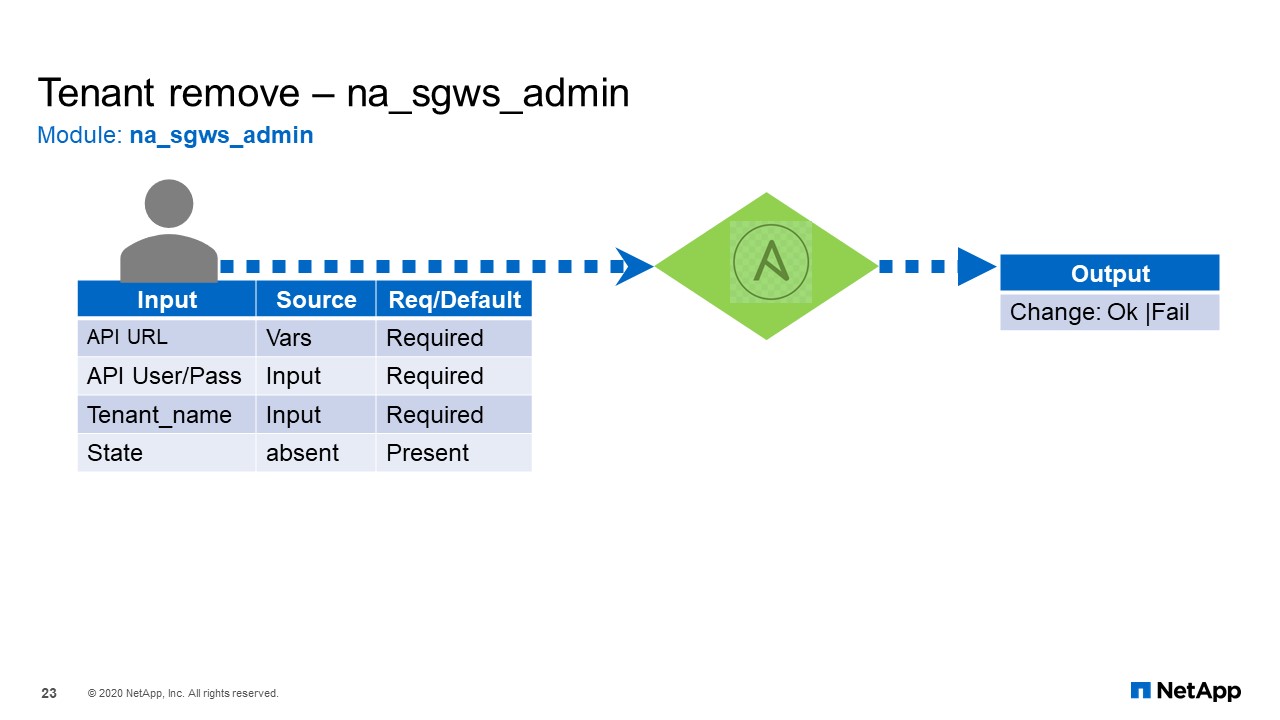
Tenant Remove
For the next one, removing or deleting the tenant. Again, just a name and the state, or it can say, “Present” or, “Absent”. In this case, since we wanted to delete the data, we set to “Absent” and resulting action will be performed.
Remove Tenant: Success
Output from deleting the tenant show it was successful.
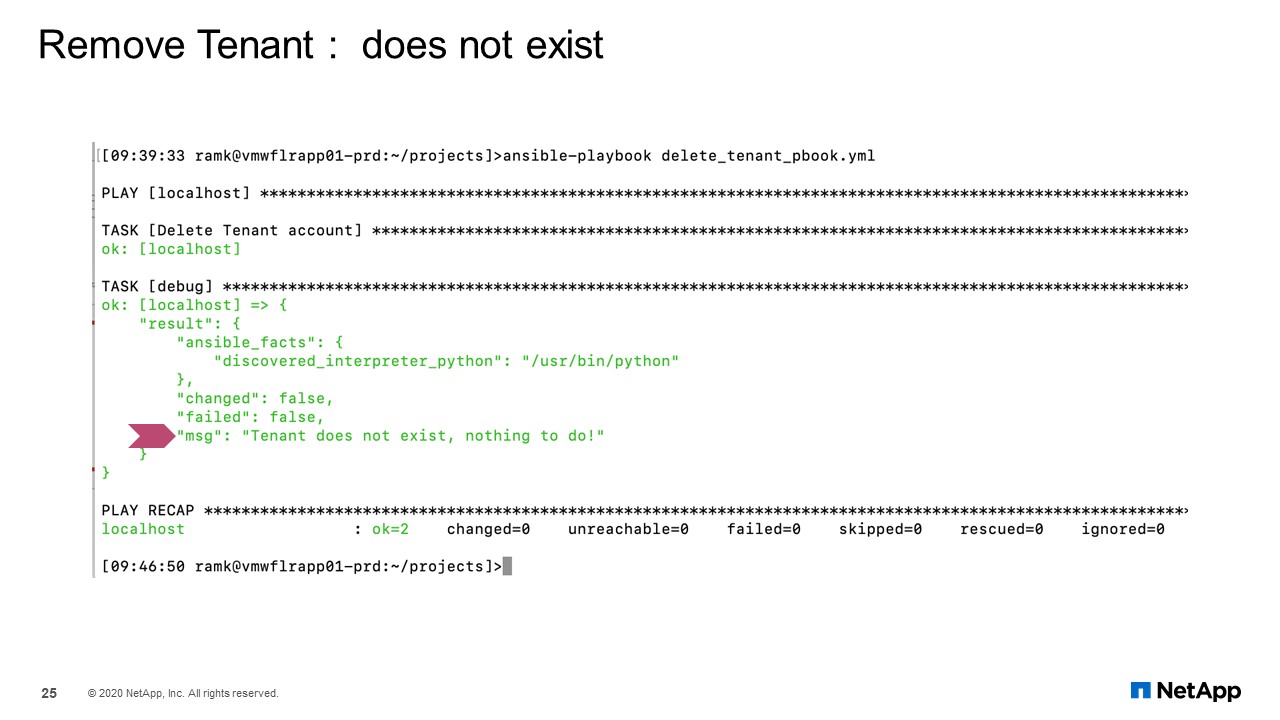
Remove Tenant: Does not Exist
In case tenant does not exist, no action will be performed as shown here in this slide.
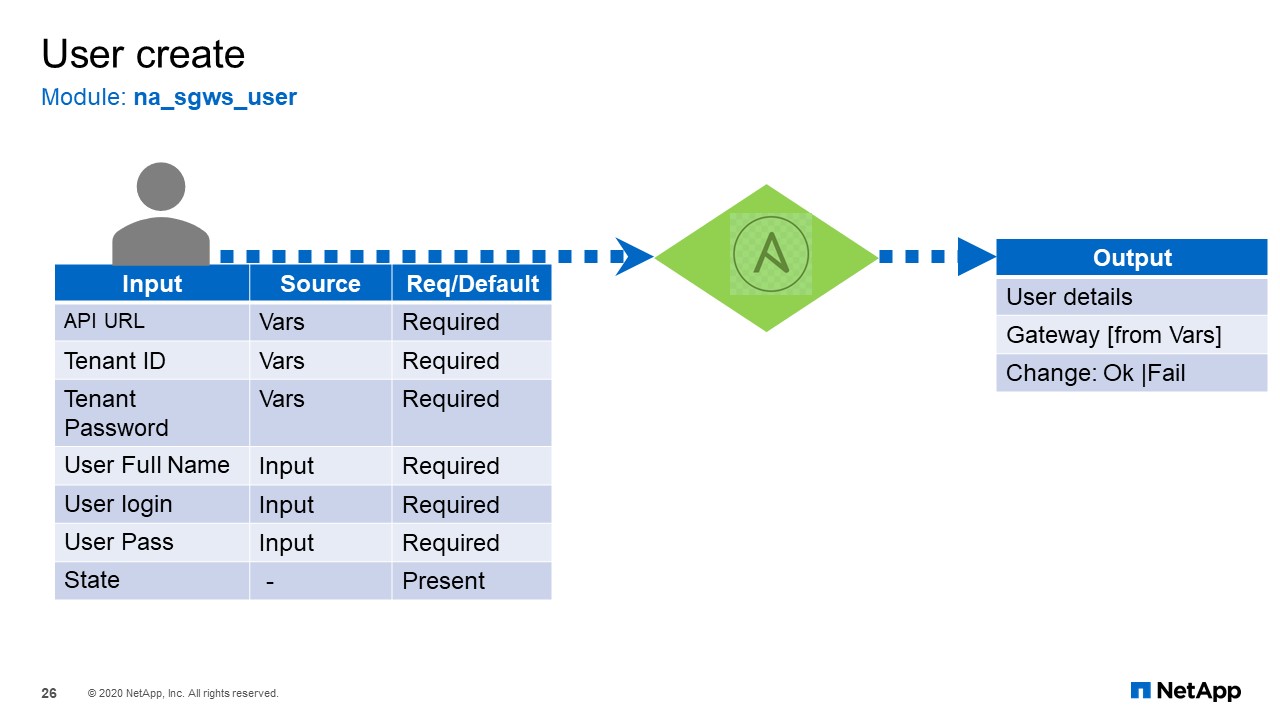
User Create
The next slide is creating a user. It is a same module used to create and delete the users. It has a similar set of input variables required for the user modules. As you can tell, the user full name, user login, and user password are required, and finally the state. The output will be the user details and the gateway specific for that create and change state.
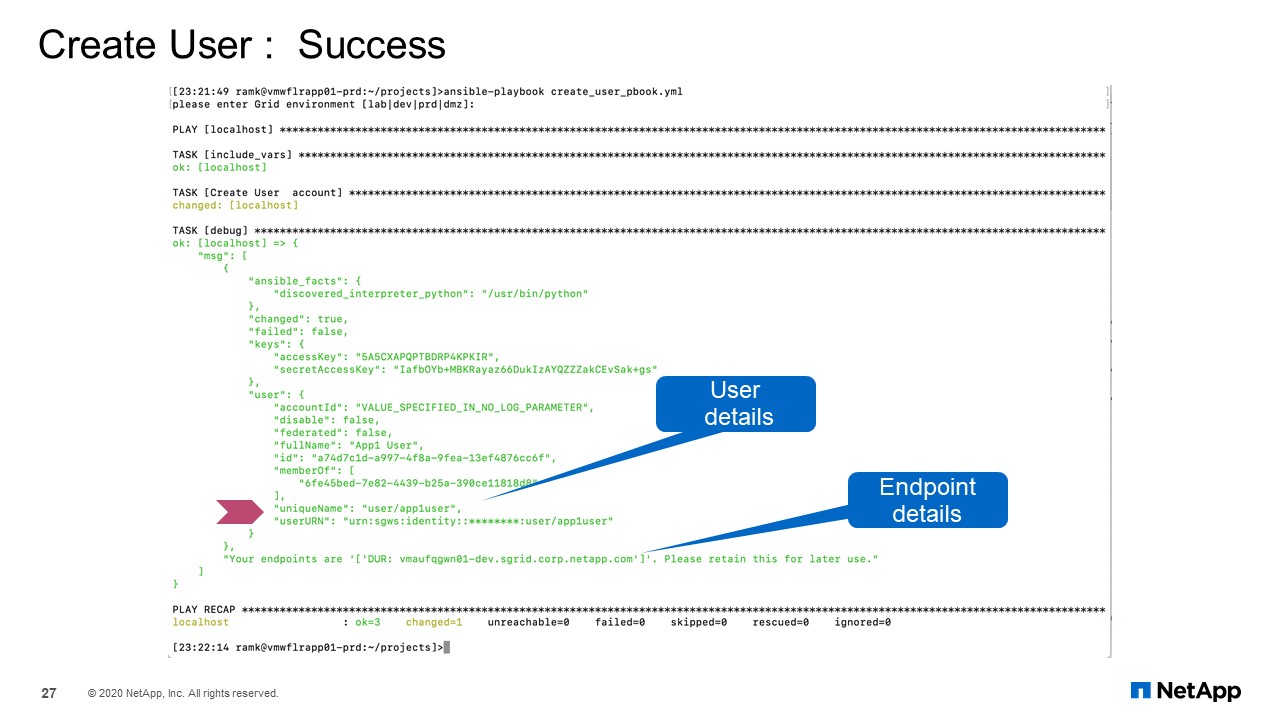
User Create: Success
Here is the output from that module. If user does not exist, it creates the user and it gives you the output.
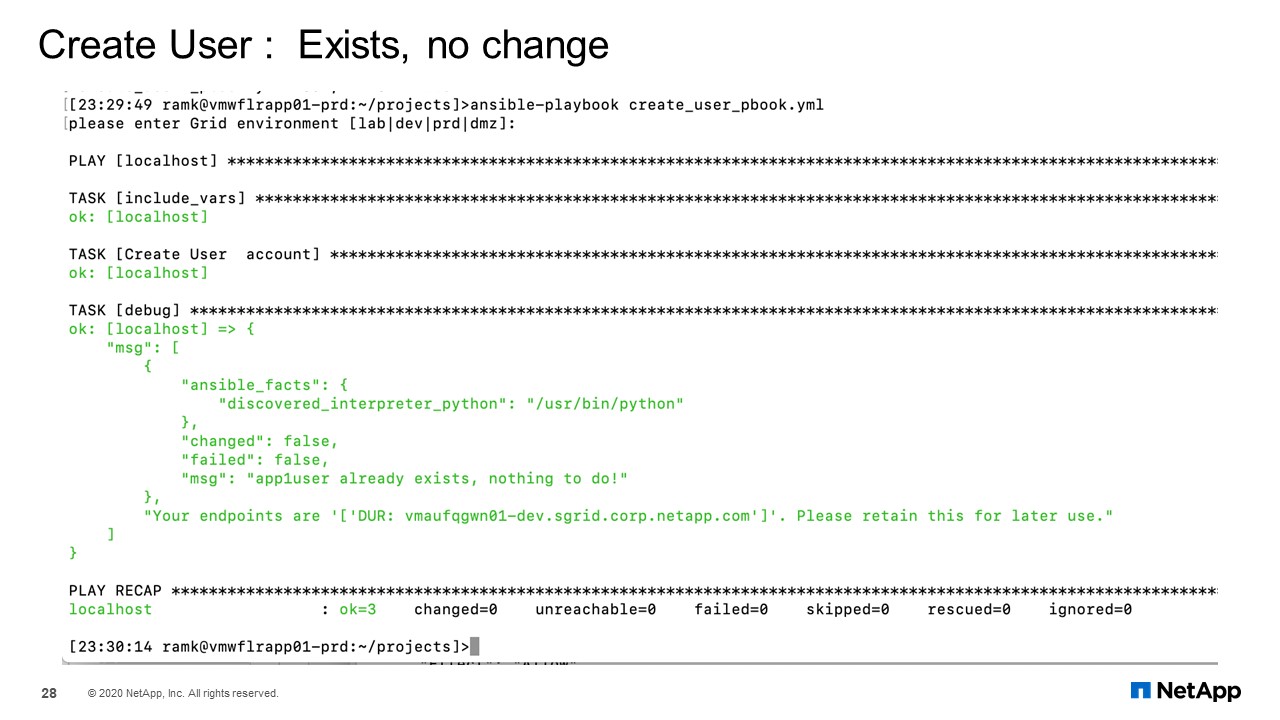
Create Users: Exists, no change
For the condition where the user already exists, no action or no change. For example, you will note that the user already exists.
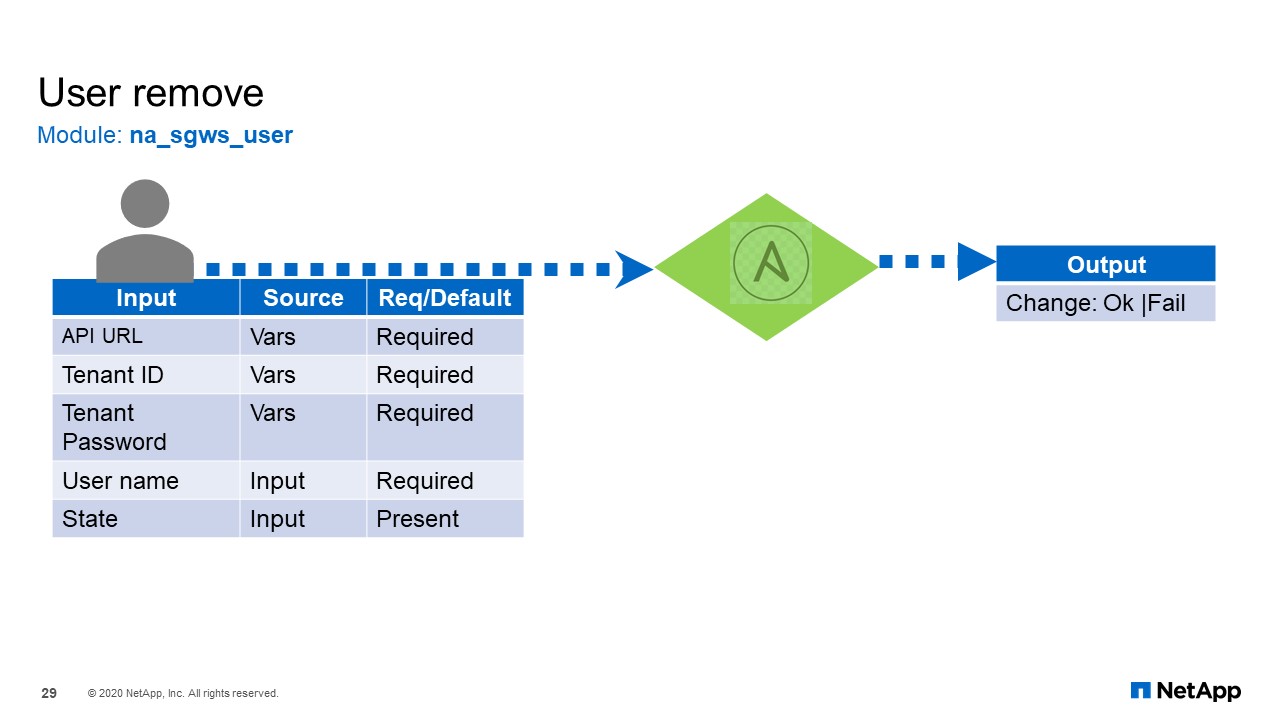
User Remove
For deleting a user, it is much the same set of input, except the state needs to be absent.
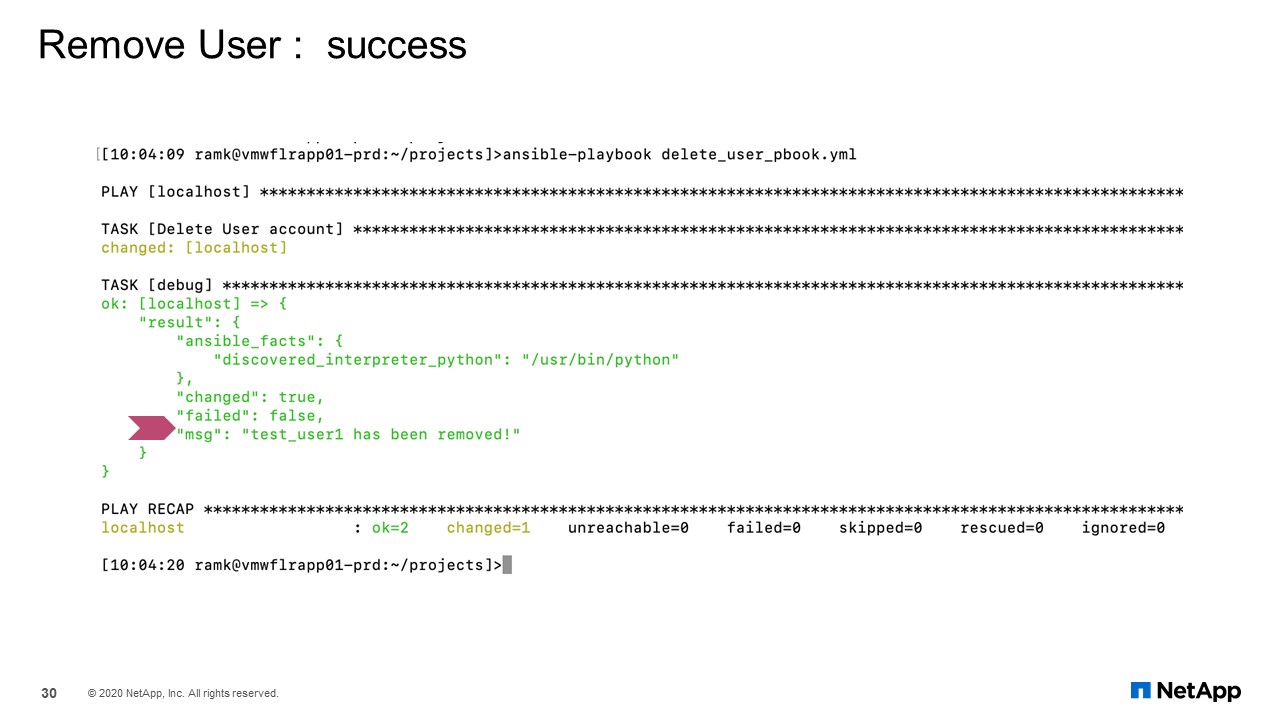
Remove User: Success
This removes the user and successfully shows remove here.
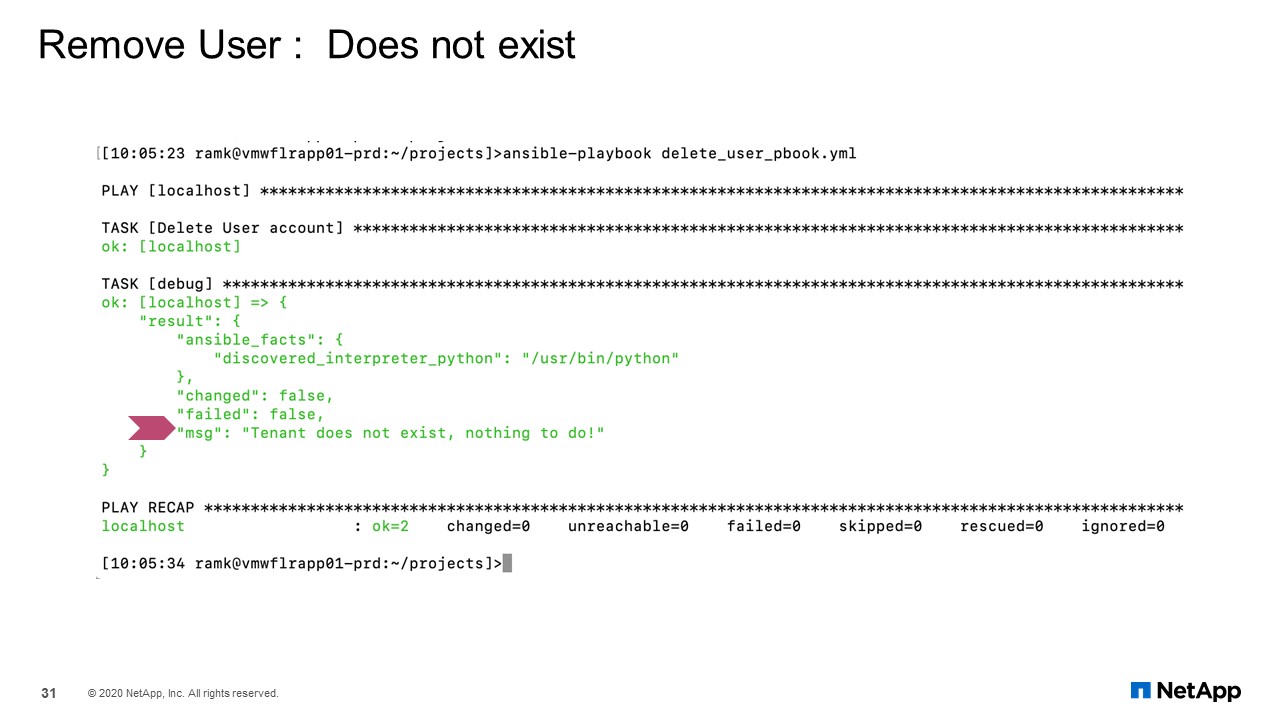
Remove User: Success
In case the user does not exist, there is no change. Changed data set to “False”, as expected.
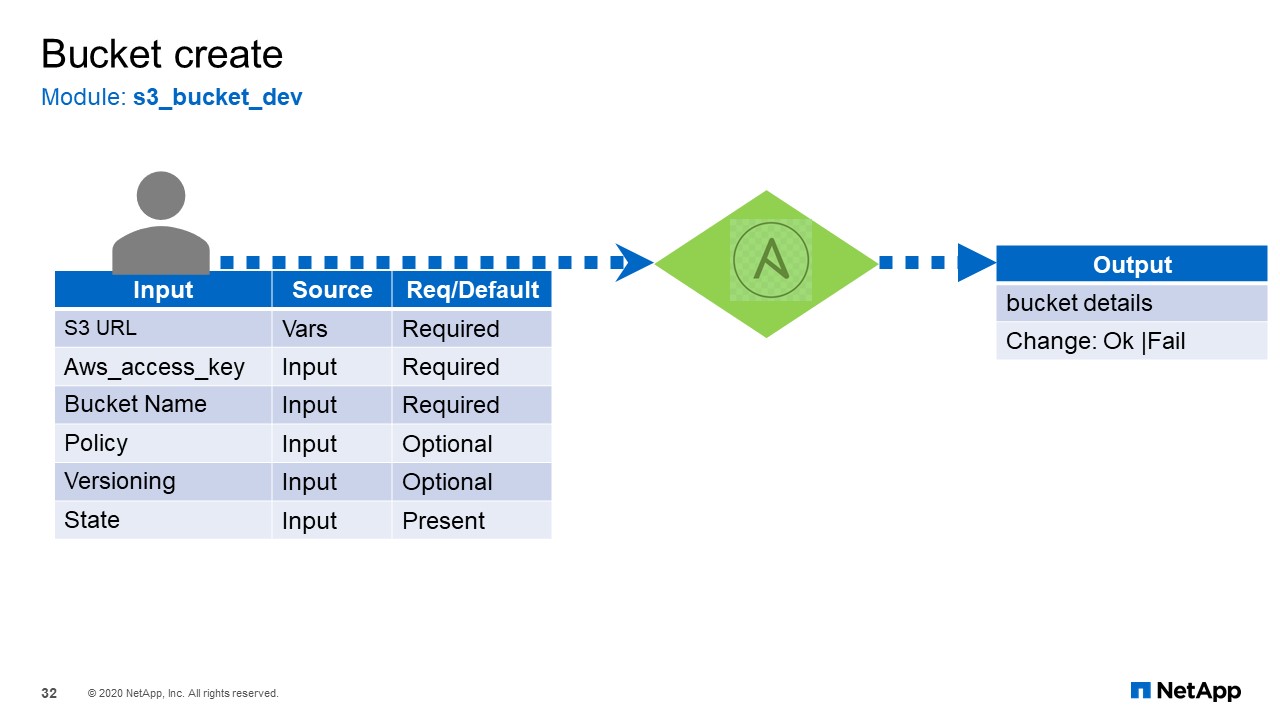
Bucket Create
Finally, bucket create. Remember I mentioned for the S3 bucket we did not use the standard model. The standard model could not be used here because our chargeback was not implemented in StorageGRID. This fix was available in the development build of the Ansible’s S3 bucket module so that is what we use. Just to make sure that we know which module that we are using, I have named it “s3_bucket_dev”. All other features are supported except for that chargeback.
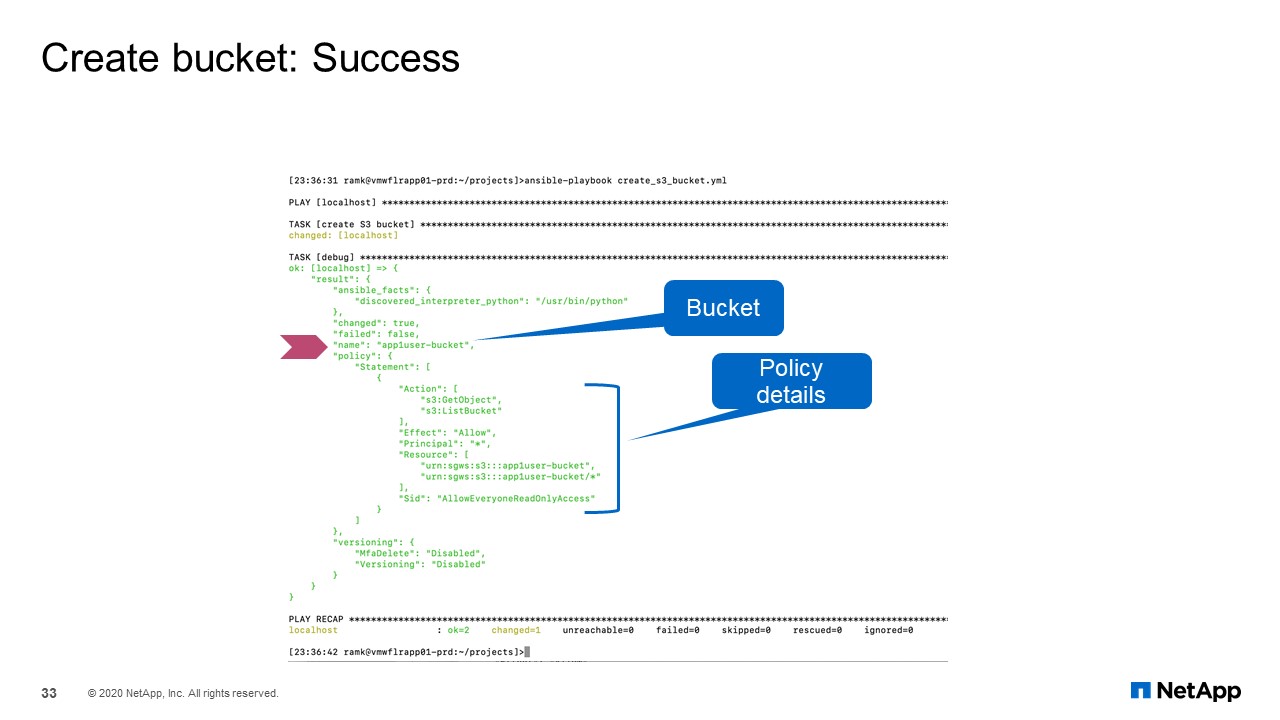
Bucket Create: Success
For creating bucket successfully, I mentioned S3 APIs are supported by StorageGRID, so we could as use the S3 bucket development module.
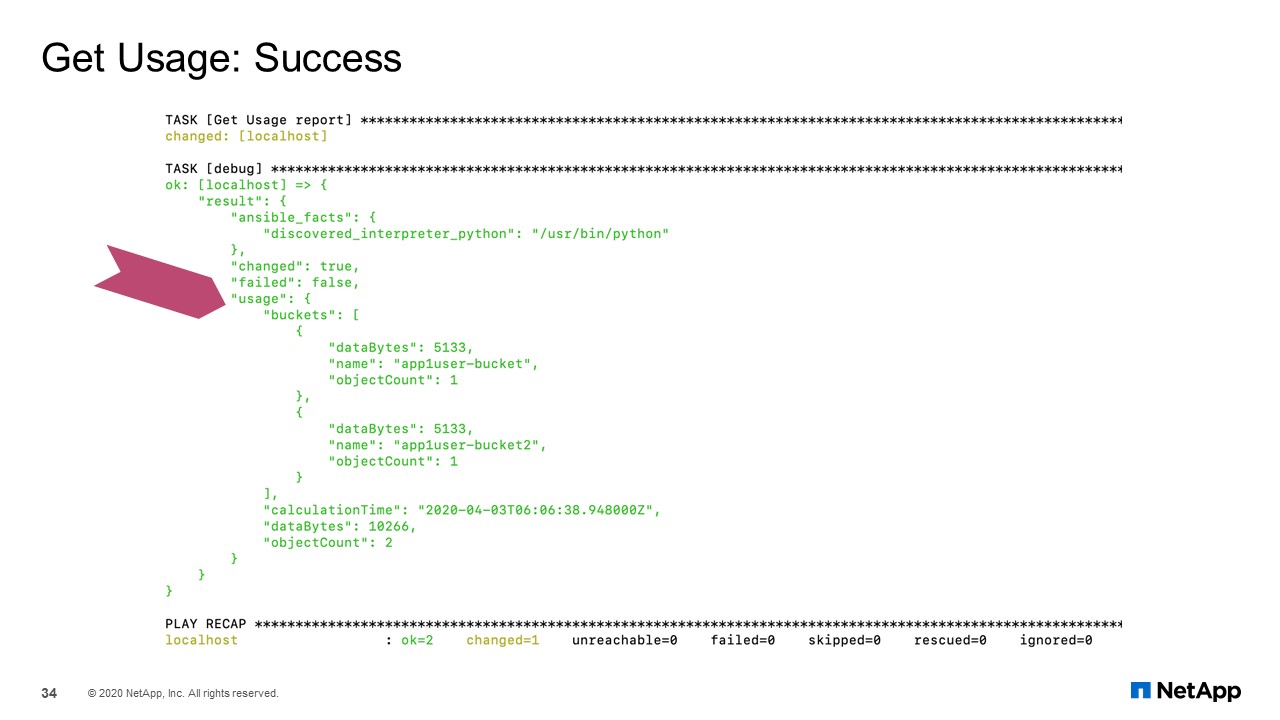
Get Usage: Success
Bucket created. For this next module, we get the usage information. Here is the output. It is simple. You just specify either the tenant or the bucket as one of the values, and it will give you the usage information. If you specify the tenant, it will list out all the buckets under that tenant. If you specify just the bucket information, it will just return the usage for that bucket.
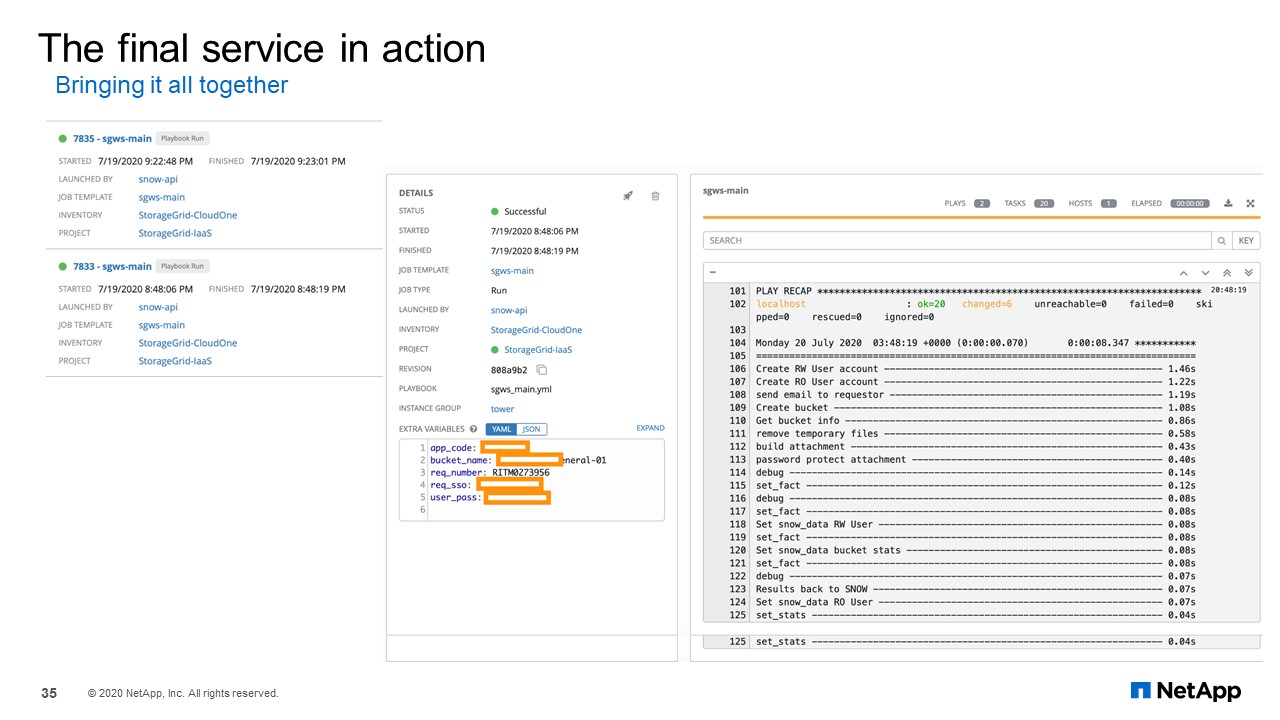
The final service in action
The final playbook creates the users, the required groups, and the buckets. It also generates the S3 keys for the user and emailing it back to them. If you were to do this manually, the traditional way where the user would submit a ticket, and then the operations lead would reach back to the requester, find out the application details and all that, going back and forth, it might take them a minimum of 30 minutes to step through each page on the admin GUI of StorageGRID. You need to go one page to one to create the user to another to create the generate the S3 keys for the user, and finally creating the buckets. Then you would have to gather all this information and provide it back to the customer.
It would take anywhere between 30 minutes to a few hours because you may have to go back and forth with the requestor to gather all the details; a delay may be involved. As you can see from this screen, what could have taken you at least 30 minutes is done in a matter of 13-14 seconds. That is an advantage with the help of automation.
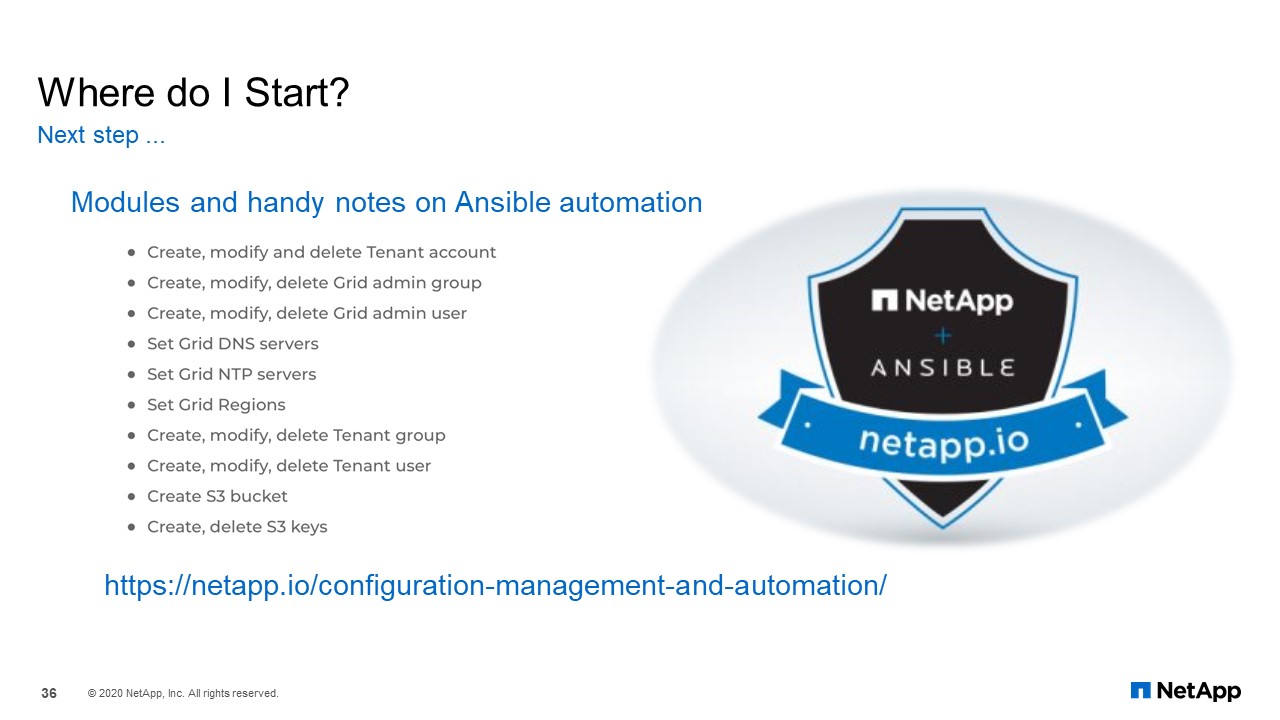
Where do I start?
Now that I have shown you all that work that we did, there is good news. You don’t have to worry about any it. As I mentioned earlier, when we started off, there were no modules available. However, as of last month, the official modules from NetApp are available now. They can create and delete tenant accounts, it can create/modify the grid admin group and the admin users just like we are doing. It goes beyond that, you can also set the DNS servers, NTP servers, set the grid regions, which our custom models are not capable of doing. In addition, there, we have our own S3 bucket and S3 keys management modules.
It is easy for you to take up any automation project. All of this is available on our NetApp.io site. There are several blogs and instructions on fetching the collections for StorageGRID. There is also a Slack channel if you want any assistance.
Thank you very much.